Showing posts with label Scrapbooking - Altered Art. Show all posts

11 April 2010

Gable Box

Oeps! Ik maar denken dat ik ruim de tijd had voor de laatste details. Blijk ik me te hebben vergist in de week! Hier alsnog mijn DT-bijdrage voor DDCCC, waar de uitdaging een "gablebox" is.

Oops! Silly me thinking I had plenty of time for the finishing details. Then it appears I have been mistaken the week! After all, here is my DT-entry for DDCCC, where the challenge is a "gablebox".


Op DDCCC vind je een kant-en-klaar patroon, wat je zo uit kunt printen. Tip: print het op cardstock, dan hoef je het enkel nog uit te knippen en kun je het doosje zo in elkaar zetten. Daarna versieren en klaar is Klara :)

At DDCCC you can find a ready to go template, which you can print right away. Tip: print the template onto cardstock, so you only have to cut it out and your box is ready to be put together. Decorate your box and ready you are!

07 March 2010

I {heart} Owls


Afgelopen maand was de kleuruitdaging op DtUC aqua & roze. Echt mijn faforiete kleurencombi. Ik heb een canvas gemaakt, die nu aan een steeds gezelliger wordende muur hangt :)

Last month the colour challenge at DtUC was aqua & pink. Really my most favorite colorcombi. I've made a canvas, which hangs on wall that's getting to look nicer and nicer :)

17 January 2010

Spekkie, a Card and a Mystery Egg Box...

Layout:


details:


Card:


Now what's in the box?


Surprise!!!!!
Eggs and ducklings! So tweet...

04 January 2010

Bon Appétit!

Voor Dare to Use Color, maakte ik deze layout op MDF-hout:
For Dare to Use Color, I made this layout on MDF-wood:


En ik heb gewonnen!!! Yay!
And I won!!! Yay! 


En m'n lieve scrapmaatje Manon is derde geworden!
And my darling scrappal Manon became third!

12 December 2009

My Stamps Album

Eindelijk heb ik een oplossing voor het opbergen van mijn stempels. Ze zaten eerst allemaal bij elkaar in een clip-box, wat ik niet erg handig vond. Nu zitten ze allemaal bij elkaar in een handige map, die ik gemaakt heb met de Bind It All. Een eenvoudige beschrijving vind je onderaan deze post.  

Finally I've got the sollution for storing my stamps. They were all together in a box first, which I didn't find very useful. Now they are stored in a clever album, which I created with the Bind It All. Find a simple description at the bottom of this post.

Zie hier het resultaat:
See the result:


De elastieken band met bloem:
The elastic tape with flower

Binnenkant:
Inside:

Achterkant:
Back:

Werkbeschrijving:
* Ik heb een pakketje van 10 transparanten op A6-formaat gebruikt.
* Snij 2 stukken grijsbord ietsje groter dan de transparanten.
* Bekleed het grijsbord met dessinpapier voor de buitenkant en cardstock voor de binnenkant.
* Inkt de randen.
* Bind het geheel met de Bind It All. Ik heb 1 inch o-wires gebruikt.
* Versier de voorkant
* Knip een elastiek op maat, naai aan elkaar en naai een stoffen bloem daar bovenop.

Description:
* I've used a package of 10 transparencies sized at A6
* Cut 2 pieces of greyboard a little larger than the transparencies.
* Adhere designpaper and cardstock to the greyboard. Designpaper is for the outside, cardstock for the inside.
* Ink the edges
* Bind the whole thing together with the Bind It All. I used 1" o-wires.
* Decorate the front
* Cut some elastic tape at size and sew it together. Also sew a fabric flower on top.

05 December 2009

Post-It Holders

Zoals beloofd, stipt om 18:00, de andere creaties die ik gister gemaakt heb.
Het zijn boekjes waarin een post-it blokje zit. Het leuke van cadeautjes zelf maken, is dat je ze ook echt heel persoonlijk kunt maken. Geen twijfel van wie welk boekje is nu.

As promised, 18:00 sharp, the other creations I made yesterday.
They are booklets with a post-it block in it. The great thing about making your own presents, is you can personalize it. No doubt who owns which booklet now.


sassafras lass, sl, bia, bind it all, post-it
mls, my little shoebox, bia, bind it all, post-it
american crafts, ac, bia, bind it all, post-it
Bedankt voor het kijken en tot de volgende keer!
Thanks for watching and see you next time!

27 September 2009

Scented Bag & Homemade Stamps

Het was alweer te lang geleden dat ik zelf een stempeltje heb gemaakt, dus vond dat ik er nu maar eens tijd voor moest maken. Ik geloof dat ik wel 30 paddenstoelen getekend heb, voor er iets naar m'n zin bij zat. Twee heb ik er uit gekozen om deze stempels mee te maken:
It had been to long since I've made my own stamp, so I thought it was about time to do so now. I think I have drawn about 30 mushrooms until there was something I liked. I chose two to turn into these stamps:
homemade, stamp, carving, cutting, mushroom, diy, zelfgemaakt, stempel, gutsen, snijden, paddenstoel, paddestoel
Afgedrukt zien de paddenstoelen er zo uit:
Printed the mushrooms look like this:
homemade, stamp, carving, cutting, mushroom, diy, zelfgemaakt, stempel, gutsen, snijden, paddenstoel, paddestoel

Vervolgens ben ik met de grote paddenstoel verder aan het werk gegaan en heb ik dit geurzakje gemaakt. Hiervoor heb ik gebruik gemaakt van sketch #7 van Get Sketchy. Het hangertje heb ik gemaakt door de paddenstoel op Krimpie Dimpie te stempelen en deze m.b.v. een heatgun te krimpen. Beschrijving voor het geurzakje (teabag eigenlijk) vind je op het blog van Double Dutch Challenges.
After making the stamps, I picked the big mushroom to work with and made this scented bag. For this I used sketch #7 from Get Sketchy. The charm I've made by stamping the mushroom on Shrinky Dinky and shrink it with a heatgun. Description of the bag (teabag actually) can be found at Double Dutch Challenges.
scrapbook, scrapping, card, scrapcard, bag, teabag, sketch, get sketchy, autumn, fall, mushroom, stamp, homemade, diy, sassafras lass, woodland whimsy, shrinky dinky, heatgun, heating tool, ink, scalloped circel, scrappen, kaart, scrapkaart, zakje, theezakje, schets, herfst, najaar, paddenstoel, paddestoel, zelfgemaakt, krimpie dimpie
Een dankjewel voor het kijken en een fijne zondagavond!
Thanks for looking and have a good sundayevening!

21 September 2009

DT Call Scrapfever

Bij Scrapfever is een Design Team Call. In zoverre, volgens mij was dit zo ongeveer de laatste dag. Het leek me wel leuk weer eens in een DT te zitten en Chantal had vorige week de call zo aan zitten prijzen, dat ik afgelopen week nog even hard aan de scrap-slag ben gegaan. Om aan de call mee te kunnen doen, moest je drie soorten werkstukken maken, te weten: een layout, een altered item en een scrapkaart. Het liefst met materiaal wat ook door Scrapfever verkocht wordt.

Voor de layout heb ik gebruik gemaakt van een paar vakantiefoto's van mijn lieve vriendinnetje. Het designpapier is van Basic Grey - Marakesh. Swirls en vlinders heb ik met de Silhouette uitgesneden. De mooie bling-bling versiering is van Prima Marketting.
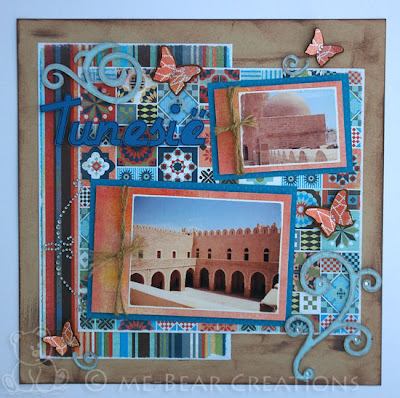
scrapbook, scrappen, layout, basic grey, marakesh, tunesie, tunesia, swirls, silhouette, quickutz, prima marketting, say it with crystals, bling-bling, dt call, kraftAt Scrapfever's they have a Design Team Call. At least they had, since this must be about the last day. It seemed fun to join a DT again and Chantal was so enthousiastic about this call she organized, so last week I've been quite bussy scrapping. To enter the call, you had to make three diferent kinds of artpieces: a layout, an altered item and a scrapcard. Using designpaper that's also sold by Scrapfever was prefered.

For this layout I used a couple of holidaypictures made by my dear girlfriend. The designpaper is Basic Grey's Marakesh. Swirls and butterlfies were cut with the Silhouette. The pretty bling-bling decoration is by Prima Marketting.


Enkele detailfoto's:
scrapbook, scrappen, layout, basic grey, marakesh, tunesie, tunesia, swirls, silhouette, quickutz, prima marketting, say it with crystals, bling-bling, dt call, kraft
Het altered item bezorgde me direct al grote vraagtekens, want wat is nu precies een altered item? Alteren is veranderen. Een soort van recycling-project dus. Alleen lijkt tegenwoordig in scrapland alles wat geen layout of kaart is óók onder altered item te vallen. Ik heb het zekere voor het onzekere genomen en ben toch voor de recycling gegaan: een Post-It houder, waarbij de kaft gemaakt is van bierviltjes (dank aan het plaatselijke koffiehuis). Designpapier is van My Little Shoebox - Who's There. De letterstickers zijn van Making Memories. Het geheel is gebonden met behulp van de Bind It All.

The altered item got me some big questionmarks right from the start, because what exactly is an altered item? Altering is changing. A recycle kind of project. But these days everything that isn't a layout or scrapcard seems to be called an altered item. I kept on the safe side and did some recycling: a Post-It holder, with the cover made of original coasters (big thanks to the local coffeecorner). Designpaper is My Little Shoebox - Who's There. Alphasticekrs are Making Memories. The lot was binded with the Bind It All.

scrapbook, scrappen, altered item, post-it holder, post-it houder, notitieblokje, bia, bind it all, my little shoebox, who's there, owl, uil, swirl, silhouette, quickutz, dt call, bierviltjes, coastersEen detailfoto:
scrapbook, scrappen, altered item, post-it holder, post-it houder, notitieblokje, bia, bind it all, my little shoebox, who's there, owl, uil, swirl, silhouette, quickutz, dt call, bierviltjes, coastersZo ziet de binnenkant eruit:
This is what the inside looks like:
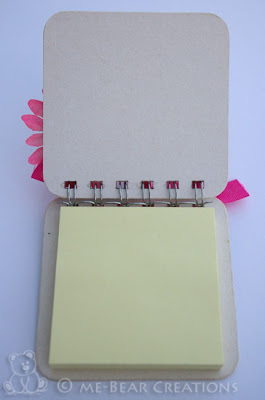
scrapbook, scrappen, altered item, post-it holder, post-it houder, notitieblokje, bia, bind it all, my little shoebox, who's there, owl, uil, swirl, silhouette, quickutz, dt call, bierviltjes, coasters
Last but not least, de scrapkaart. Geïnspireerd door de schildpadden op het designpapier, heb ik een schildpad-ontwerp gemaakt voor de Silhouette (freebie volgt spoedig voor de liefhebbers). Het oogje is een zwarte eyelet. De groene appel is gemaakt van fimo. Papier is van My Little Shoebox - Turtles And Trees.

Last but not least, the scrapcard. Being inspired by the turtles on the designpaper, I designed my own turtle to cut with the Silhouette (freebie will follow for those who like). The eye is an eyelet. The green apple I've made with Fimo polymerclay. Paper is My Little Shoebox - Turtles And Trees.

scrapbook, scrappen, scrapcard, shapecard, scrapkaart, my little shoebox, turtles and trees, turtle, schildpad, eyelets, kraft, silhouette, quickutz, dt callEen detailfoto:
scrapbook, scrappen, scrapcard, shapecard, scrapkaart, my little shoebox, turtles and trees, turtle, schildpad, eyelets, kraft, silhouette, quickutz, dt callDe binnenkant, met een speciaal kader om een wens, groet of korte boodschap te schrijven:
The inside, with a special place to add a wish, sentiment or short message:

scrapbook, scrappen, scrapcard, shapecard, scrapkaart, my little shoebox, turtles and trees, turtle, schildpad, eyelets, kraft, silhouette, quickutz, dt call
Nu wachten op de uitslag. Ben benieuwd. Ik heb het hoe dan ook weer erg naar m'n zin gehad tijdens het scrappen van deze drie projecten, dus dat heb ik alvast gewonnen... ;)

From now it's waiting for the declaration. I'm curious. In any way I enjoyed working on these projects very much, so I have already won something... ;)

11 September 2009

Nieuw Vriendinnetje :o)

Sinds deze week heb ik een nieuw vriendinnetje: de BIA :o) Ik vind haar super! Omdat een miniboekje veel te veel voorwerk was voor een snelle eerste testronde, heb ik een paar Post-It Holders gemaakt. Dit is één van de drie. Een cadeautje voor een vriendin.
Since this week I've got a new girlfriend: the BIA :o) I think she's super great! Because a minibook would be to much of pre-work for a quick first testround, I've made a couple of Post-It Holders. This is one of three. A present for a friend.

scrapbook, scrapbooking, scrappen, BIA, bind it all, sassafras lass, bungle jungle, altered art, post-it holder, post-it, note-holder, note, notebook, homemade
scrapbook, scrapbooking, scrappen, BIA, bind it all, sassafras lass, bungle jungle, altered art, post-it holder, post-it, note-holder, note, notebook, homemadeFoto's van de andere holders volgen nog...
Pictures of the other holders will follow...

ingrediënts:
2 coasters
zutter bind it all
zutter o-wire 1/2"
designpaper: sassafras lass - bungle jungle
post-it
flowers, brad, ric-rac ribbon
swirl: quickutz silhouette
dymo junior labeling embosser

10 July 2009

No Milk Today

Al een tijdje wilde ik er eentje maken en deze week is het er dan eindelijk van gekomen.
It's for a while now that I wanted to make one of my own and this week it finally happened.

Een allerschattigst klein melkpakje.
An ubercute little milkcarton.
Jawel, hij kan ook echt open en dicht.
Indeed, it actually opens and closes.
Maar geen melk vandaag, als het van dit pakje afhangt, want hij is écht klein.
But no milk today, if it's for this carton, because it's really tiny.
Hoe klein? Nou, zo klein!
How small? Well, this small!

Het designspapier is van Sassafras Lass (had vast niemand in de gaten :o) ) en voor het pakje heb ik een mal gebruikt van Linda Lucine. Heel veel dank voor het delen, Linda.
The designpaper is by Sassafras Lass (nobody noticed, right? :o) ) and for the carton I used a template by Linda Lucine. Thank you so much Linda for sharing.

02 June 2009

Miniboekje - stempelmapje

Vanavond heerlijk aan het werk geweest. Het ging goed en ik ben zelfs blij met het resultaat.
Tonight I have been delightfully working. It went well and I even am quite satisfied with the result.

Voorkant:
Binnenkant:

Het is een miniboekje uit 1 vel dubbelzijdig dessinpapier. Deze heb ik speciaal gemaakt om stempelafdrukjes in te bewaren. De beschrijving voor dit boekje heb ik van de blog van Julie.
This is a minibook out of 1 paper doublesided designpaper. This one I made to save stampprints in. The how-to I've got from the blog of Julie. Thanks for sharing this tutorial, Julie.

ingrediënten:
cardstock: purple
designpaper: little yellow bisycle - zinnia
stamp: imaginisce
eyelets, brad, ricrac ribbon, identipen

22 April 2009

Teabag / Theezakje


gekleurd papier/colored paper
stempel: Maya Road
eyelet flower
lint/ribbon
strass steentjes
stuk kartonnen doos en touw


Dit was eigenlijk de uitdaging van vorige week bij Double Dutch Challenges. Helaas had ik geen tijd om aan de challenge zelf mee te doen, maar ik vond de opdracht zo leuk, dat ik hem wel wilde maken. Het theezakje is gevouwen (zie DDC of Cards Only 5 voor de beschrijving) en geplakt. Daarna gevuld met een lekker geurtje. In dit geval heb ik er een bestaand geurzakje in leeggegooid ;) Belangrijk is wel om dun papier te nemen voor het zakje, anders houdt het papier de geur tegen en is je doel gemist... Toen het zakje zelf klaar was, begon het feest van het versieren. De strik heb ik gemaakt op de "bunny ears" manier: alle twee de uiteinden als een lus dubbelvouwen en daarna een enkele knoop maken van die twee lussen.
This used to be last week's challenge at Double Dutch Challenges. Unfortunately I didn't have time to join the challenge itself, but I liked the idea of the teabag so much, I just had to make it. The bag is fold and adhered like a real teabag (have a look at DDC for the how-to). After that I filled it with a nice scent. In this case I just emptied an excisting scent bag ;) Important is to use thin paper, since thick paper will keep the scent inside and so you miss your goal... When the bag was finished, the party of decorating started. I made the bow at the "bunny ears" way: fold both ends double as a bow and then make a knot of those two folded ends.

11 April 2009

Candybox

Voor 2 Sketches 4 You:


Laura's Sketch 23:


Materiaal:
Cardstock: Kraft
Designpaper: My Little Shoebox
Plakparel: Make Me
Overige: ric-rac bruin; catseye brown; strass steentjes

01 April 2009

Miniboekje: Wilde Fjorden


Eindelijk, hier is-ie dan: het mini boekje over de wilde Fjorden! Gemaakt voor een meisje met maar één grote liefde: paarden :o) De foto's zijn gemaakt in de Haagse Duinen. Nederland is echt wel mooi :o)
Finally, here it is: a mini book about wilde Fjord Horses! Made for a girl with only one big love: horses :o) The pictures are taken in the dunes of The Hague. The Netherlands really are beautiful... :o)

24 March 2009

Scrapfrummels en een cadeautje

Afgelopen zaterdag was het Scrapfestival bij Pipoos. Uiteindelijk toch een make&take meegedaan. Het is geen kaart, maar een soort 'verpakking' waar je bijvoorbeeld een geurzakje tussen kan doen. Erg leuk om te maken. Daar gaan er vast nog meer van volgen. En met meer tegelijk scrappen is en blijft zo ontzettend leuk!
Saturday last it was Scrapfestival at Pipoos, a national craftstore (pipoos is after "pipo the clown" who used to be very famous when I was a child...the store still carries a clown image in their logo). At the end of the day I decided to join a make&take. It's not a card, but some kind of 'box' where you can put something like a scent bag in between. Lovely to create. There will probably follow more of these. And scrapping with more than just one people is always so much more fun!

cardstock: roze, donkerrood, grijs en wit
designpapier: Basic Grey-Bittersweet
brads, plakparels
diverse bloemenponsjes
lint en raffia


Deze was voor 2 Sketches 4 You, maar toen ik 'm eindelijk af had, was het al zo laat dat m'n ogen haast dicht vielen. Ik kon het niet meer opbrengen om nog een foto te maken en deze op mijn blog te plaatsen. Helaas paashaas! Toch was het wél een heel leuke sketch om mee te werken en ik móest mijn nieuwe aankopen van die middag bij Pipoos natuurlijk ook meteen gebruiken. Wat een heerlijke lijn is dit zeg! De tekst heb ik in PSP gemaakt en op een clear sheet geprint (die met één ruwe zijde). Daarna vastgemaakt met die oude trouwe Velpon. Wat heerlijk dat dit nog steeds bestaat!
This one was for 2 Sketches 4 You, but when I finally had it finished, it was already so late that I hardly kept my eyes open. I couldn't find the strength to take a picture and put it on my blog. Too bad sandwichspread! But it wás a great skech to work with and I just hád to use the new paper I bought that very afternoon at this craftstore. What a lovely line this is! The text I created on the comp using PSP and I printed it on a clear sheet (the ones with one rough side). I adhered it with good old Velpon, my favorite glue since the very first day I started using 'real' glue (in stead of the kindergarden stuff). I'm so delighted it still exists!

Cardstock: roze en kraft
Designpapier: Cosmo Cricket-Girl Friday
Naaimachine en een beetje bling-bling;)


En dit is het kaartje waarvan ik dácht dat het voor Card Patterns was, maar tijdens het werken bedacht ik me dat het toch wel verdacht veel leek op de sketch die ik voor het koetje gebruikt had (DDCC-Sorry I Forgot....) Dat krijg je als je nog in de late uurtjes zit te werken, dan maak je domme fouten. Het wás natuurlijk ook dezelfde sketch die ik zat te gebruiken in plaats van de werkelijke sketch van Card Patterns. Hoe dom kan je zijn :P En hij is nog niet eens naar tevredenheid ook! Achteraf had ik er beter meer kleurcontrasten in kunnen gebruiken. Even het één en ander matten. Nou ja, al doende leert men. En ook van je fouten kun je leren :o)
And this is the card from which I thóught it was for Card Patterns, but while working on it I realised the sketch looked pretty much the same as the one I used for the little cow (DDCC-Sorry I Forgot...) This is what happens when you work in the late hours, you end up making stupid mistakes. Of course it wás the same sketch I was using in stead of the real sketch from Card Patterns. How foolish can one be :P And I don't even like this one! Now I see I should have used a little more contrasting colors. Just matting a little here and there... Ah well, practice makes perfect right? And one can also learn from mistakes :o)

Cardstock: roze en blauw
Designpapier: Basic Grey-Urban Prairie
Ricrac lint, geel fruit-lint
nietjes en een beetje bling-bling
naaimachine én "ouderwets" embossinggereedschap :o)


Als laatste nog een cadeautje wat ik een tijdje terug van iemand kreeg. Het was lastig om het goed op de foto te krijgen, maar het is een glas dat ze zelf gegraveerd heeft. De afbeelding is "Owl" van Winnie the Pooh.
As a final picture this present someone gave me a while ago. It was hard to get it right on photo, but it's a glas which she engraved herself. The image is "Owl" from Winnie the Pooh.